In this blog post, you will be reading about how to Size and Wear Cloth Diapers Step by step. Go ahead and watch the Video tutorial for better understanding. The Video contains a demo of Sizing the diapers according to each weight category and wearing the diaper on the baby. Turn on Captions for on-screen instructions.
How to Size Cloth Diapers?
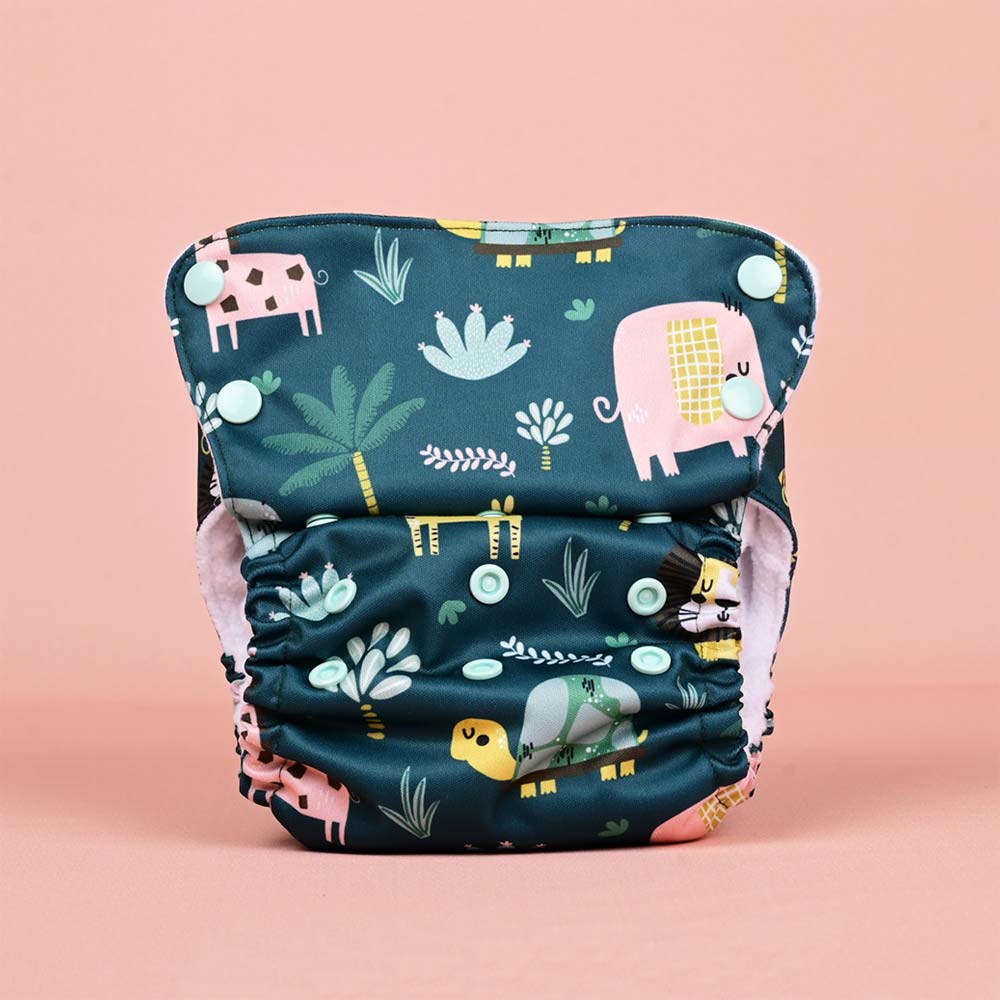
Free Size Cloth Diapers contain rise snap buttons to adjust the length of the diapers. The Rise snap settings have 4 rows of buttons with which you can adjust the size according to the baby’s weight. Each row of snap buttons is assigned its weight category. Take a look at the size chart below to know which category your baby falls under. You can adjust the rise snap according to that category for a snug fit. Only then you won’t face leaks with the diapers.
How to Size Free Size Diapers
Rise snap settings:
The Diaper Size is divided into 4 weight categories.
Low Rise setting: Snap the lowest row of buttons to the topmost ones for babies weighing 5 kilograms to 8 Kilograms.
Medium Rise Setting: Snap the second from the lowest row of buttons to the topmost row. Follow this if your baby weighs between 8 kilograms to 11 kilograms.
High Rise setting: For babies weighing 11 kilograms to 14 kilograms, snap the second from the top row of buttons to the topmost row.
No Rise setting: If your baby weighs between 14 Kilograms to 17 kilograms, you need not have rise settings. That is you need not snap any buttons and leave it as such.
Side Snap Settings:
The Rise snap setting is to adjust the length of the cloth diaper. Whereas the Side snap setting is to adjust the hip size of the diaper according to your baby’s. The Flap (wings) of the diaper has 5 columns and 2 rows of buttons. You can snap the tummy panel onto the suitable buttons in the wings. You need to make sure that there is a two-finger size gap at the tummy. So that the diaper is not too tight for your baby.
- Related: How to Size Newborn Diapers
- Related: How to Size Fluffie
How to Wear Cloth Diapers:

Most ideas on the internet and blogs say or describe wearing Cloth Diapers as such a chore. But it is easy as a piece of cake. You only need to know what is needed. There are no scientific mechanisms involved. And you don’t need to be a pilot. You need to keep in mind only these 12 steps.
12 Easy steps to wear Just Bumm Cloth Diapers:
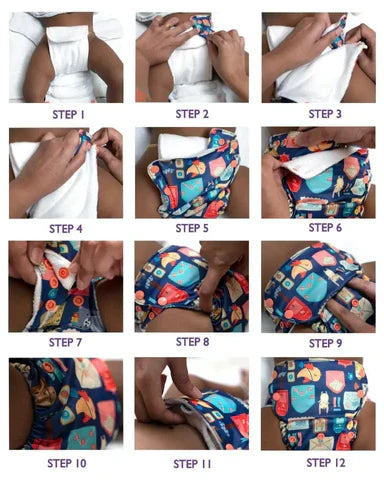
Step 1: Presize the Cloth diapers and attach the pads to the outer cover. Place the liner on top if needed before wearing the diaper. Place the Cloth diaper below the baby or keep the baby above the diaper.
Step 2: As shown in the image, fold the excess of the Insert outwards while against the baby’s tummy. Pull the wing flap over the folded insert.
Step 3: Pull the tummy panel and secure the thigh buttons.
Step 4 and 5: And then the hip buttons.
Make sure you pull the tummy panel well. Not with too much force. Pull enough so that you can secure the buttons with ease.
Step 6 and 7: Repeat the same on the other side as you did before. Pull the wings and secure the buttons.
Now, wearing the cloth diaper does not end with just this. You have to adjust few things to avoid leaks. The fit is not perfect yet.
Step 8: As seen in the picture, put your finger through the leg elastics and run through. Push the elastics on to the leg crease line simultaneously. This should remove any folds.
Step 9: Put your fingers in the space between the rise setting and tuck the fabric upwards. To Prevent the Cloth diaper from drooping, do this step. This also gives a nice look and snug fit.
Tips:
The last 3 steps – 10,11 and 12 show that there should be no gaps near the thighs and leg elastics. And there should be only 2 fingers gap at the tummy. The Last step shows how the cloth diaper eventually looks or how the Cloth diaper should look. Only then, leaks won't occur even if the baby sleeps on their side or tummy. This tutorial is applicable for all Just Bumm Free Size Diapers – Aurora Max Diapers and Dream Diapers. Please note that you should not wear anything inside before wearing cloth diapers. It is only for the privacy protection of the baby.
Posts you may like:


Leave a comment
All comments are moderated before being published.
This site is protected by hCaptcha and the hCaptcha Privacy Policy and Terms of Service apply.